In this post we give step-by-step instructions for how to send email newsletters using our newsletter plugin, WPNewsman.
In a nutshell, our plugin provides all you need to collect subscribers, create and send personalized email newsletters at your WordPress site.
This guide assumes that you have already installed WPNewsman on your site and activated it. If you have not done it yet, you can download the plugin now.
Now follow the steps below to create and send your first newsletter using WPNewsman.
1. Configure Email Settings
The first step is to configure the plugin settings and enter your sender information including the From email address, Return email address, Reply email address and choose the sending mode.
Click on WPNewsman at the left hand side of your dashboard and then click on “Settings”.
Click on “Email Settings” tab.
By default the plugin uses your admin email settings on your blog. Here you can change the sender’s From Name, Email address and Return Email Address. The Return Email Address has to be on the same domain as the sender’s address and must be dedicated solely to bounces, nothing else.
If you change anything in the Email Settings, click on the “Update Options” button to save the changes.

Now click on the “Delivery Settings” tab.
WPNewsman supports different delivery options. By default the plugin uses PHP Mail. This mode works on the majority of servers and will work well for you too while you have a small list of subscribers or just start using our newsletter plugin to collect subscribers.
Type your email address and click “Send Test Email” button to check if PHP Mail works for you. If everything is OK, you’ll see “Test Email was sent to your email” at the top of your monitor and the message that your SMTP settings are correct will come to your inbox.
If PHP Mail does not work on your site, you can use the custom SMTP server.
Check the “Use Custom SMTP Server” option and enter the SMTP server information:
Hostname – name of your SMTP server
Username – your user name for the SMTP server
Password – your password for the SMTP server
Port – 25 by default
Now click “Send Test Email” button again to test your settings.
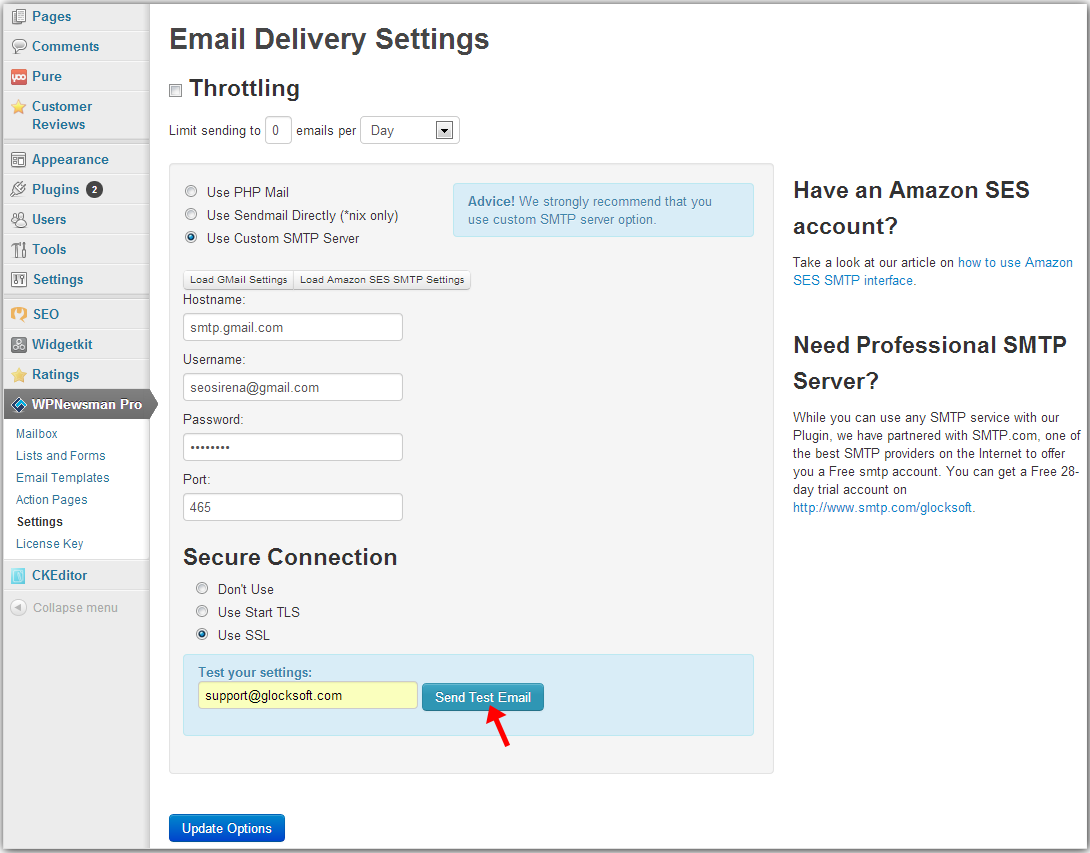
Click on the image to enlarge it
If you have more than 2000 subscribers, we recommend that you use Amazon SES SMTP settings to send your newsletters. With Amazon SES you can forget about email limits set by your host while at the same time enjoy high deliverability rate like big Email Service Providers.
Click “Update Options” to save the changes.
If you are the user of the Pro version of WPNewsman, click on the “Bounce Handler” tab to configure the settings for processing bounced emails.
Enter your Incoming Mail Server settings here.
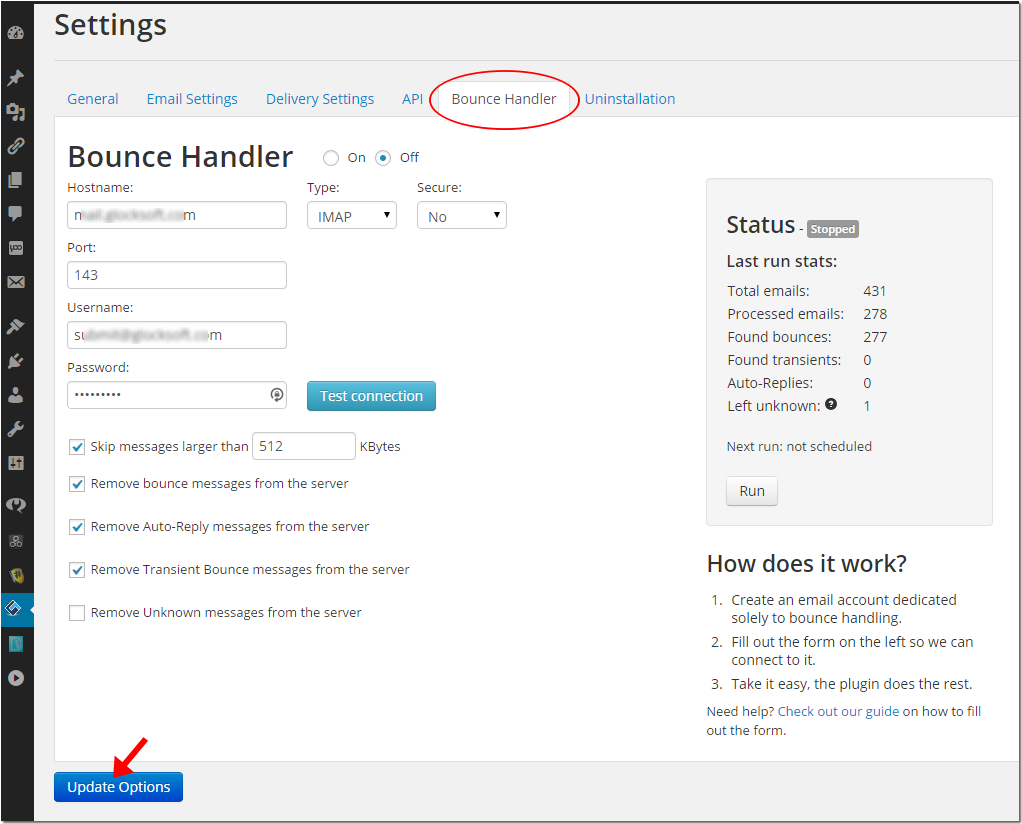
Click on the image to enlarge it
WPNewsman does not delete hard bounces from your list. It only changes the subscriber status to “Unsubscribed by Bounce Handler”. In order hard bounced and auto-reply emails are not accumulated in your mailbox, you can check the options and let the plugin to delete such emails from the server.
As always, click “Update Options” to save the settings.
2. Import Subscribers
The second step is to import subscribers into the list. If you already have some subscribers on the list, just skip this step.
If you have just installed WPNewsman and want to send a newsletter to your existing subscribers, follow the steps below to import your subscribers from a csv file into the list in WPNewsman.
Click on “Lists and Forms” under WPNewsman in your dashboard. The plugin creates a list automatically can calls it “default”. If you want, you can create a new list and import existing subscribers into the new list.
Click on “View Subscribers” under the list name.

Click “Import from CSV” button.

Click “Upload a file” and select the .csv file on the disk.
Click on the file name.
Map the fields correctly.
Click “Import”.

The subscribers will be imported with the “Confirmed” status into the list.
Send your email newsletters only to the recipients who gave you their consent and subscribed to receive emails from you. If you send newsletters to email addresses that have been purchased or harvested from the internet, you risk being marked as spammer.3. Compose Email Newsletter
Now you can go to WPNewsman “Mailbox” and start composing your email newsletter. You can create a newsletter from a scratch, or use a template.
Click on “Mailbox” under WPNewsman at the left hand side in your dashboard.
Compose Quick Message
To create an email newsletter from scratch, click on “Compose” and select “Quick Message”.

Type the message text in the editor, or go to the source and copy-paste the HTML source of your newsletter.
Compose Newsletter from Template
If you already have a newsletter prepared in a different application, you can import it into WPNewsman and use your template for the message design.
The import works with .zip files only. The zip file must contain the html file and the folder with the images used in the html file. The html file must have the same name as the zip file. Example: if the zip file is test.zip, the html file inside the zip file must be test.html.
To import the template, click on “Email Templates” in the WPNewsman menu in your dashboard.
Now click on “Install New Templates” and select “From File…”.

Click on “Upload a file” and select the .zip file on the disk.
Click “Import”.

If you don’t have your own email template, you can choose a template from the plugin’s template store. There are many beautiful email templates that you can download and use to create email newsletters.
Click on the “Install New Templates” button and select “From Templates Store…”.

Choose the templates library – Hot Email Templates or Campaign Monitor.
Click “Download” under the desired template.

Click “Close” after the template is installed.
After you import or install the template from the store, go to “Mailbox”, click on “Compose” and select “From Template”.
Click on the template name to open it in the edit mode. Now you can proceed by editing the template, which can be customized any way you like. Feel free to add text, images, change logos, colors, etc.
To make the images display correctly inside the email message, upload the images to your web site and load them from the site into the message. For your convenience you can create the images folder on your site and upload the images to that folder. Example: http://www.yourdomain.com/images/logo.png
4. Add Blog Posts to the Newsletter
If you want to send a posts digest, you can quickly insert posts into your newsletter.
Put the mouse at the place where the first post will start.
Click on the “Insert Posts” button on the editor.

Select the post type, categories, authors, content (“Full post”, “Excerpt” or “Fancy excerpt”).
Click on the posts you want to add to the template to select them. Click on “Day”, “Week” or “Month” button if you want to select the posts for the specified time period.
Click OK.

5. Add Unsubscribe Link to Newsletter
Put the mouse where you want to insert the unsubscribe link.
Click on the Newsman button on the editor toolbar and select “Unsubscribe”.

To insert the link to an online version of the message, select “View Email Online”.
Using the same menu you can insert links to your social profile pages “Follow on Twitter”, “Friend on Facebook”, “Connect via LinkedIn”, or “Add on Google+” as well as “Current Date” and “Subscription Date”.
6. Send Test Message
It’s highly recommended that you send a test email to yourself to make sure it displays well.
Click on “Send test email” at the right side.
Enter your email address.
Click “Send” button.

Now check your Inbox and see how the message is displayed.
The Unsubscribe link does not work in the test message. The plugin inserts a fake unsubscribe link into the test message.7. Send Newsletter to Subscribers
Now you have come to the very last step – sending your newsletter to the subscribers.
Type the message Subject.
Click the mouse in the To field to display your subscribers’ lists. Select the list you want to send your newsletter to.
Click “Send”.

This is how to create and send an email newsletter with WPNewsman.
Got questions? Ask them through our contact form. We will do our best to help you resolve your problems and answer your requests.
Download G-Lock WPNewsman for free
and start building your in-house email list right away!